Ultra-Seal

Parquet Covered Flagstone Floor Restoration Edinburgh Southside

Restoring a Parquet Covered Flagstone Floor in Refurbished in Edinburgh Southside

I was contacted by the new owners of a townhouse in the southside of Edinburgh who needed help restoring an old Flagstone floor. They had uncovered the flagstones beneath parquet flooring during renovations and the thick adhesive was proving problematic.

Flagstone floor during Parquet and Adhesive Removal Edinburgh Southside

The clients were keen to restore the floor as a feature of their oval-shaped reception hallway, which was a highlight of their home. They wanted to retain the natural, rustic charm without making it look artificially shiny.

I went over to take a look and could see that although structurally sound the stone was heavily soiled having absorbed decades of dirt and grime so once the glue had been removed it would need a deep clean. I worked out a detailed quote for restoring the floor, which was accepted and a date set.

Removing Parquet Adhesive from Flagstones

The first challenge was to remove the thick parquet adhesive and residues. To do this the thick parts had to be carefully scrapped off until it left a thin residue. Next a strong dilution of Tile Doctor Remove & Go which is a powerful coatings remover was sprayed onto the tiles. This was allowed to dwell and soak in for about twenty minutes to give it time to break down the glue. Then it was agitated with a heavy-duty rotary floor machine fitted with a coarse black scrubbing pad. The resulting slurry was then removed with a wet vacuum.

With the bulk of the residues removed, I turned my attention to deep cleaning the stone. For this a strong dilution of Tile Doctor Pro-Clean was applied and worked into the stone using the same rotary machine and another pad. The grout lines and edges were scrubbed manually using detail brushes to ensure a consistent clean.

The slurry was extracted using a wet vacuum gain, and the floor was thoroughly rinsed with water several times to remove any remaining residues. The floor was then left to dry naturally for a few days, aided by air movers.

Sealing an Indian Flagstone Hallway

Once dry, I tested for moisture using a moisture meter to ensure the stone was ready to be sealed. Tile Doctor Ultra-Seal was chosen for this; it’s a natural look sealer that doesn’t change the stone and which would give the completely natural appearance they wanted. It’s also a full breathable and ideal for use on flagstone and other natural stone floors in older properties where damp can be a concern.

Two coats were applied to ensure full coverage and protection; Ultra-Seal is an impregnator that works by occupying the pores in the stone ensuring dirt remains on the surface where its easily cleaned away.

The transformation was stunning. The once-dull and neglected stone now looked vibrant and full of character in keeping with the historic nature of the property. Additionally, the new seal will protect the floor against stains and dirt for many years to come.

Flagstone Floor After Restoration Edinburgh Southside

The clients were delighted and commented that the restored flagstone floor had become the centrepiece of their renovation. They were also reassured to know it would be much easier to keep clean for which I recommend Tile Doctor Neutral Tile Cleaner.

If you have a flagstone floor that could use some expert attention, whether it’s been recently uncovered or simply needs a refresh, get in touch. I cover Edinburgh and the surrounding areas.


Professional Restoration of an Indian Flagstone Hallway in Edinburgh

Restoring a Parquet Covered Flagstone Floor in Refurbished in Edinburgh Southside Read More »
Travertine Kitchen Floor Restoration Inverkeithing

Dirty and Pitted Travertine Floor Restored in Inverkeithing Firth of Forth

A new homeowner from the Royal Burgh of Inverkeithing, Fife not far from the Forth crossings made contact regarding their Travertine tiled floor. The installation was quite large and covered the entire ground floor of the 200-year-old property including the Kitchen. Having worked on similar Travertine floors I was confident we could resolve the issue of heavy soiling and pitted tiles.

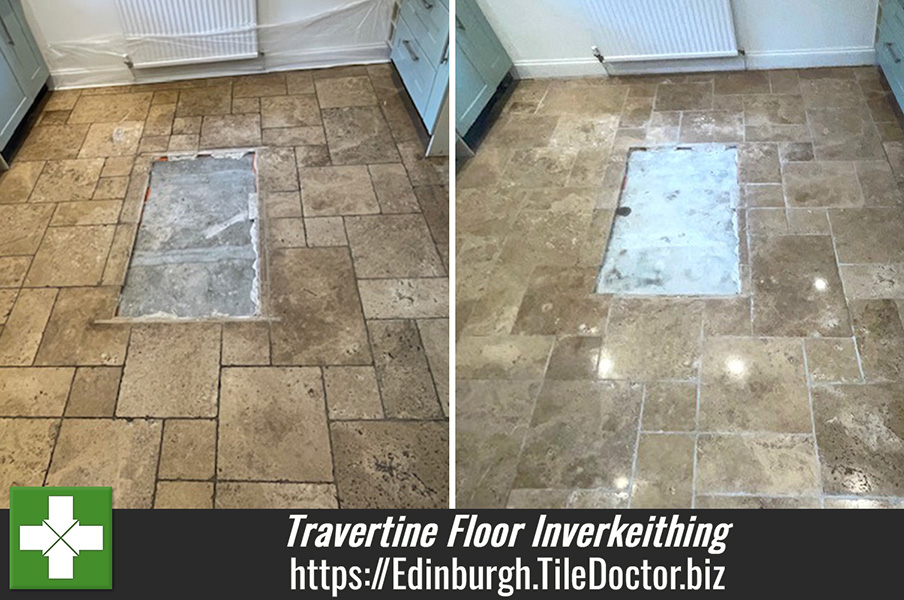
Travertine Kitchen Floor Tiles Before Clean and Seal Inverkeithing

I arranged to call in and survey the tiled floors in each room so I could get a better understanding of the issues and provide a quote for the renovation. I could see the main problem was heavy soiling but there was also pitting in the tiles which is quite common with Travertine but in this case was impacting the look of the floor. Pitting is basically small holes in the surface of the tile and is usually unnoticeable, however in this case dirt had become ingrained in the tile surfaces and the floor was proving very difficult to clean leaving it looking dull and permanently dirty.

I proposed deep cleaning the Travertine to remove the ingrained dirt and then filling the holes with a colour matching resin to prevent this happing in future. Then polishing the Travertine to restore their appearance and finally adding a protective sealer to keep them looking that way going forward.

Having taken measurements and copious notes, I was able to send over a detailed quote which was accepted and then a date agreed for the work to begin.

Cleaning, Filling and Polishing a Travertine Tiled Kitchen Floor

The floor was swept to remove any loose dirt and grit before starting the cleaning process with the first of a set of four burnishing pads which is a coarse 400-grit fitted to a rotary machine. This pad is designed to remove minor scratches, sealers whilst opening the pores of the stone so ingrained soiling can be flushed out. The pad is applied to the floor with water for lubrication and each tile is worked over four times to ensure maximum contact. The dirt is literally pulled out of the Travertine into the water turning it black and then once a section has been cleaned the floor is rinsed with water and the soiling extracted with a wet vacuum.

After the first pad attention was turned to the grout lines which is cleaned by hand using a stiff grout brush and Tile Doctor Pro-Clean. This combination reaches into the recessed grout lines where pads can struggle to reach and pulling out the soiling and returning the darkened grout back to its original appearance. Afterwards the floor is rinsed and extracted again with water.

The burnishing process was then repeated using the second and third pads using the same process. This starts with a medium 800-grit pad and then a finer 1500-grit pads rinsing with water after each and extracting the slurry with the wet vacuum as before. These finer pads close the pores in the stone and start to bring up the polish on the stone.

I use air blowers to speed up the drying time during this process and once completed work moved onto filling the pitted areas with a resin filler. The filler is colour matched to blend in with the natural brown and cream colours of the Travertine as closely as possible. The resin takes approximately 30 minutes to properly set.

Sealing a Travertine Tiled Kitchen in Inverkeithing

Sealing needs to be applied when the tiles are dry so I returned a few days later day and started off by going over the floor with the last pad in the set which is a very fine 3500-grit. This last pad is applied dry with a small spray of water on the floor. The 3500-grit pad polishes and dries the floor whilst smoothing off any filler in the pitted areas of the tiles.

The last step was to be sealing the floor to prevent dirt from becoming ingrained going forward and make it easier to clean. As the tiles were light in colour, we choose a natural look sealer called Tile Doctor Ultra-Seal for this. It’s a tough sealer that suits heavy traffic areas and I find is best applied using a paint pad applicator. Ultra-Seal is an impregnator which works by soaking into the pores of the stone ensuring dirt remains on the surface where it can be easily cleaned away.

Travertine Kitchen Floor Tiles After Clean and Seal Inverkeithing

Although my photographs are not the best hopefully you can see how much cleaner and shinier the Travertine tiles are and how white the grout has become, certainly my customer was pleased with the transformation. For aftercare I recommended the use of Tile Doctor Stone Soap which is a mild yet effective cleaning product that has an additive that helps maintain the lustre on polished stone.

Professional Renovation of a Travertine Tiled Kitchen Floor in Edinburgh

Dirty and Pitted Travertine Floor Restored in Inverkeithing Firth of Forth Read More »

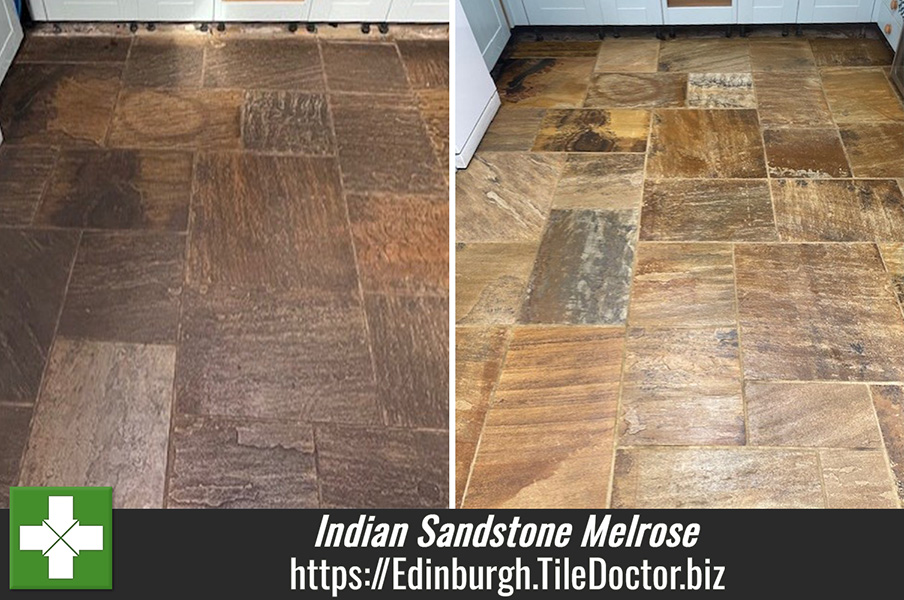
Indian Sandstone Kitchen Floor Renovation Melrose

Badly Ingrained Indian Sandstone Floor Deep Cleaned and Sealed in Melrose

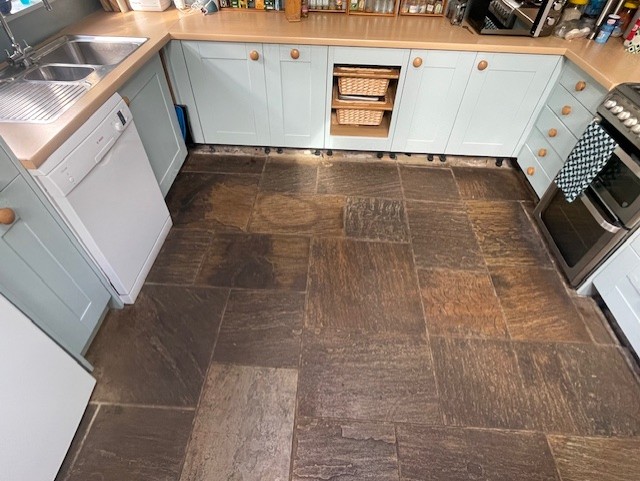
This Indian Sandstone tiled floor had been installed in the Kitchen and Dining room a property in Melrose fifty years prior. Although it was cleaned weekly the sealer had long since failed and dirt had penetrated the pores of the stone leaving it permanently dark.

The years of ingrained soiling were especially bad around the cooker and sink areas, making it impossible for standard cleaning products to make any difference. The wonderful colours and markings of each stone tile were completely hidden due to the soiling. Interestingly you could still see the original colour of the clean sandstone behind the kickboards under the kitchen units so the owner had a good idea of the floor’s potential.

Indian Sandstone Kitchen Floor Melrose Before Clean and Seal

I explained the floor would need an intensive clean to flush the years of dirt out of the pores and then a fresh sealer added to protect it going forward. Keen to have the floor restored to its original condition they accepted my quote, and a date was set for the work to start which would take two days.

Cleaning an Indian Sandstone Kitchen

On day one I removed the kick boards and started deep cleaning the Sandstone to remove the ingrained soiling. To do this the tiles were soaked with a strong dilution of Tile Doctor Remove & Go and this was left to soak in for fifteen minutes. This gives the solution time to digest the dirt and any remaining sealer so it can be lifted to the surface and cleaned away.

The floor was then scrubbed with a special silicon carbide brush fitted to a rotary floor machine. This brush really gets into the recesses of the grout lines and helps to scrub the dirt out of the stone especially if it has a riven surface.

After going over each of the stone tiles three to four times with the brush the floor was rinsed with water and all the residue removed with a wet vacuum. The floor was then given a second clean and thorough rinse to ensure all the residue had been removed.

A third clean was then completed using Tile Doctors Grout Clean-Up, which further cleans the stone and also treats efflorescence. This time the product was scrubbed in with a black pad. Once completed the floor was again rinsed with water and the residues removed with a wet vacuum as before.

Sealing an Indian Sandstone Kitchen

The floor was then left over night to dry, and I returned the next day where work started by ensuring the floor was dry by testing the moisture levels on various parts of the floor. It’s important that the floor is dry before sealing as otherwise it can look patchy.

All was well and so I started with the first coat of Tile Doctors Ultra-Seal, a natural look impregnating sealer, chosen by the client. This was allowed to dry for thirty minutes before starting on the second coat. This sealer is a tough durable sealer with a matt finish.

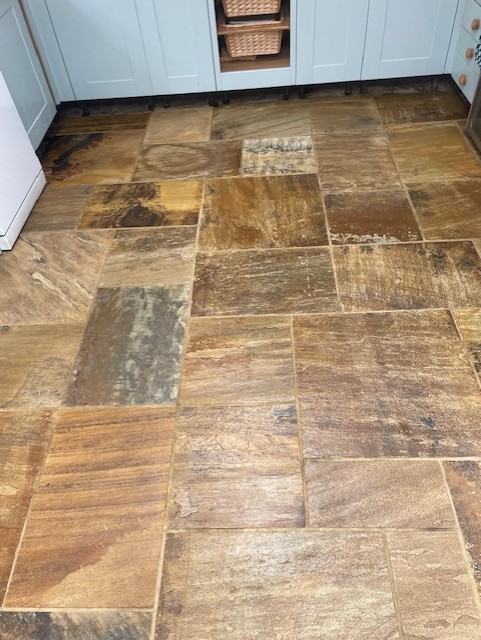
Indian Sandstone Kitchen Floor Melrose After Clean and Seal

Once complete the Sandstone tiles and grout looked very clean indeed and all the features of the stone were clearly visible returning the character to the floor. To maintain the fresh look and sealer going forward I recommended the tiles were cleaned using a Tile Doctors Neutral pH cleaner which lifts soiling but won’t erode the sealer.


Professional Restoration of an Indian Sandstone Kitchen in Edinburgh

Badly Ingrained Indian Sandstone Floor Deep Cleaned and Sealed in Melrose Read More »

Scroll to Top