tile sealing

Victorian Tiled Floor Before After Restoration Edinburgh

Glue-Stained Victorian Tiled Hallway Repaired and Restored in Edinburgh

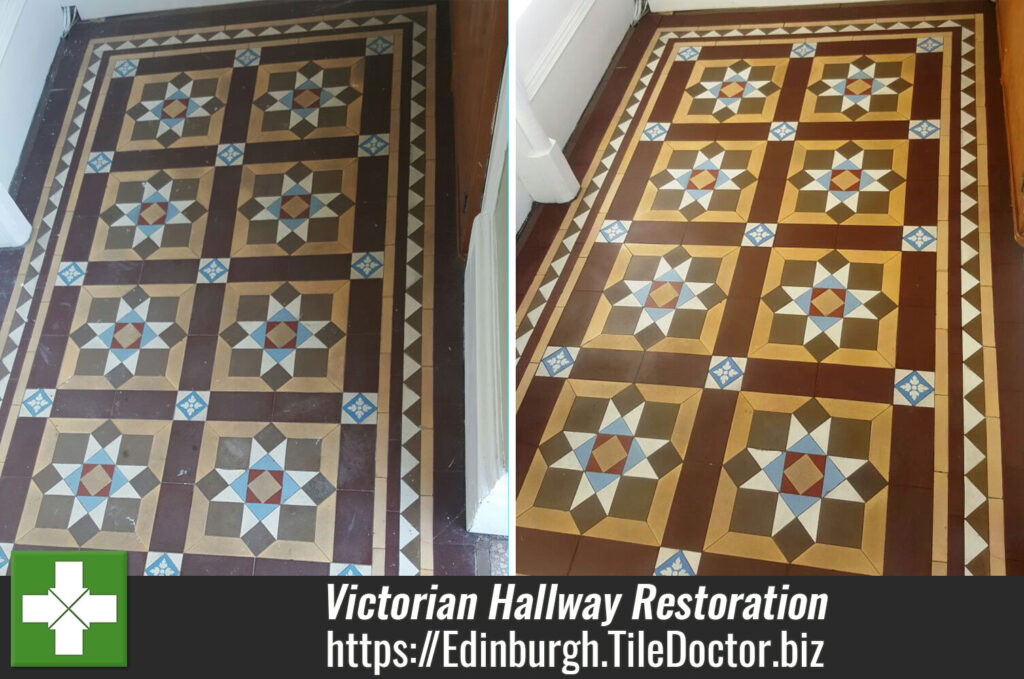
As you can see from the photographs below this beautiful Victorian Tiled Hallway floor in Edinburgh was in a bad state of repair. The floor has been covered with carpet for many years and the thick adhesive had completely stained the tiles; in fact, you can still see the pattern of the underlay marking the worst parts of the tile. It could be worse as I have seen this done with gripper rods nailed straight through the tile before.

Victorian Tiled Hallway Floor Edinburgh Before Restoration Victorian Tiled Hallway Floor Edinburgh Before Restoration

On top of that part of the floor had completely collapsed between the staircase and doorway to the bathroom. This would need to be raked out, backfilled with cement and then re-tilled with replacement tiles that were a close match to the original

Victorian Tiled Hallway Floor Edinburgh Before Restoration

I discussed with the client the work needed to carry out a full restoration and gave them a quote. Aware of the fact that original tiled hallways can improve the value of a property they were happy to accept and we scheduled a date for the work to commence.

Removing Carpet Adhesive from a Victorian Tiled Hallway Floor

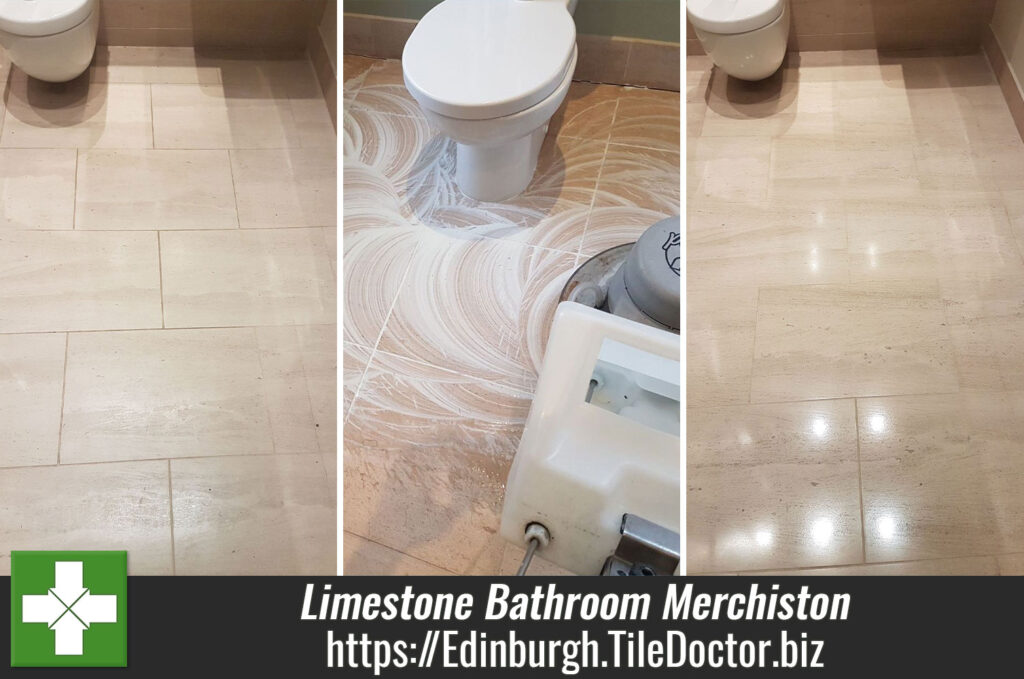
Work started by carefully removing as much of the thick glue and underlay as possible with hand scrapers. Once done I treated the floor with Tile Doctor Acid Gel and scrubbed it in with a rotary floor buffer machine fitted with a Black pad. This generated a lot of soiling that was then extracted with a wet vacuum and the floor inspected.

It was obvious to see that more work was needed to remove all traces of the glue so I decided to switch up a gear and use more Acid Gel but this time scrubbed in with a very coarse 100-grit diamond pad followed by a 200-grit pad. Encrusted with industrial diamonds these pads are more expensive than the black scrubbing pads however using the black pad first did remove a lot of the large particles that would have otherwise clogged up the diamond pads. This process worked well and by the end of the afternoon I had managed to remove all the debris left by the carpet and glue.

Victorian Tiled Hallway Floor Edinburgh During Restoration

Repairing a Collapsed Victorian Tiled Hallway Floor

The next ask was to focus on the collapsed section of flooring which started by cleaning out the rubble and backfilling with concrete board and cement until it was level with the existing floor.

Victorian Tiled Hallway Floor Edinburgh During Restoration

I used around forty reproduction Victorina Tiles in this area carefully placing them to match the original pattern and cutting them to the right size where required. A fast-setting adhesive was used to fix them in place followed by grouting.

Victorian Tiled Hallway Floor Edinburgh During Restoration

Sealing a Victorian Tiled Hallway Floor

You can’t apply a sealer to a damp floor and the tiles needed some time to dry out after the cleaning so it was around a week later before I returned to finish the work by applying a protective sealer.

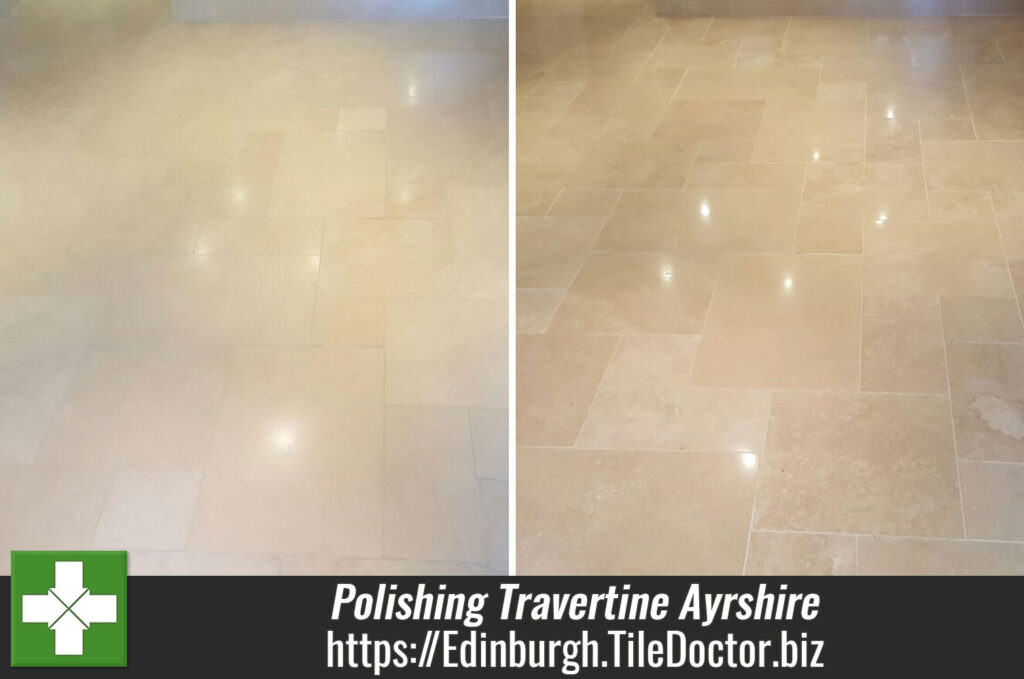
Given the age of the floor I decided to apply a fully breathable sealer called Tile Doctor Colour Grow. This is an important consideration when sealing old, tiled floors as it will allow for any moisture to rise through the tile and evaporate at the surface, otherwise moisture can become trapped until the floor resulting in damp issues. Colour Grow also contains a colour enhancer that brings out the colours in the tile and works by soaking into the pores of the tile making it long lasting, again another important consideration for a busy hallway.

Victorian Tiled Hallway Floor Edinburgh After Restoration Victorian Tiled Hallway Floor Edinburgh After Restoration

The client was very pleased with the newly restored floor, and for ongoing cleaning I recommended the use of Tile Doctor Neutral Tile Cleaner. This product has a neutral Ph which is ideal for sealed surfaces; stronger bleach-based cleaners are simply too strong for use on sealed tiles and will erode the sealer prematurely.

Victorian Tiled Hallway Floor Edinburgh After Restoration


Professional Restoration of a Victorian Tiled Hallway in South Yorkshire

Glue-Stained Victorian Tiled Hallway Repaired and Restored in Edinburgh Read More »

Porcelain Shower Cubicle Tiles Expertly Refreshed in Edinburgh

Porcelain Shower Cubicle Tiles Expertly Refreshed in Edinburgh

Porcelain is a popular choice for tiles in modern homes due to its superior durability. It also makes a particularly suitable material for shower tiles because of its natural water resistance. Nonetheless, Porcelain tiles – just like any other type of tile – still require routine cleaning and maintenance to stay looking fresh and attractive.

This is especially the case for shower tiles, as they are subject to mould and scum caused by exposure to the dyes in shampoos and soaps etc which as well as staining the tiles can have a dramatic effect on the grout. Below is a photo of a Porcelain shower cubicle I was asked to restore in Edinburgh. The process for restoring these types of tiles is relatively quick and easy, providing you use the right products and methods. Here’s how I did it.

Shower Grout Before Restoration in Edinburgh

Cleaning and Sealing Porcelain Shower Cubicle Tiles

To begin refreshing this cubicle, I gave the whole area – paying particular attention to the grout lines – a scrub down using Tile Doctor Duo Clean. Duo Clean is our product of choice for the removal of the common mould and soap scum that builds up on cubicles like this one.

Next, I rinsed down the area with fresh water to remove any trace of cleaning product and then left it to dry for a short period of time. It’s difficult to get the grout lines perfectly clean, especially after years of neglect, but we can resolve the situation by simply recolouring the grout.

Shower Grout During Restoration in Edinburgh
I this case I felt the grout although cleaner from when I started did need more work so I decided to go ahead and apply a Grout Colourant. Tile Doctor has a range of Grout Colourants available in ten colours so I painted on three coats of the white colourant which really improved the look of the grout leaving it clean and fresh. Another advantage is the colourant acts as a barrier on top of the grout sealing the grout joint and protecting them from further staining. Other popular colours available in the range include Black, Cappuccino, and three shades of Grey.

Finally, I ripped and out and replaced the mouldy silicone around the base of the shower cubicle and replaced it with fresh.

Shower Grout After Restoration in Edinburgh
The client was very impressed with the speedy restoration. Before leaving the property, I explained that rinsing down the shower cubicle with fresh water after every use can help to reduce the effect of staining and leaving the door and window open after a shower improved ventilation and inhibit the growth of mould. Naturally you can always give me call if the situation gets out of hand.

Professional Tile Cleaning, Grout Recolouring and Sealing for a Mouldy Porcelain Shower Cubicle Restoration in Edinburgh

Porcelain Shower Cubicle Tiles Expertly Refreshed in Edinburgh Read More »

Polished Limestone Bathroom Tiles Transformed in Merchiston, Edinburgh

Polished Limestone Bathroom Tiles Transformed in Merchiston, Edinburgh

We often come across tiled floors that have simply never been maintained after their original installation. This inevitably leads to problems: over time, the sealer starts to wear away, particularly in high traffic areas, allowing dirt and staining to become easily ingrained in the stone and grout. The longer this is left unaddressed, the harder it becomes to clean the tiles.

An excellent case in point are this cream coloured Polished Limestone tiled floor installed in the downstairs WC and upstairs bathroom of a property in the prosperous Merchiston area of Edinburgh. The floor were already laid when the customer bought the house 10 years ago, and as far as they know, it has never experienced professional maintenance.

Limestone downstairs toilet Floor Merchiston before
The result of this is quite clear: just looking at the photos below you can see how dull and unimpressive the tiles looked before I was called in to restore them to their best possible condition. The customer was particularly unhappy with how easily the floor became stained and patchy where the sealer had failed in certain areas of the floor.

Limestone Bathroom Floor Merchiston before

Cleaning and Burnishing Limestone Floor Tiles

To clean the Limestone tiles, I used Tile Doctor’s system of four diamond encrusted burnishing pads, which range from Coarse to Very Fine. The abrasive Coarse grit pad are applied to cut back through the stone to remove stains, while the Fine and Very and Fine pads are applied to achieve a high quality polished shine.

The pads are fitted to a rotary machine in sequence from coarse to fine and lubricated with a small quantity of water which is sprayed onto the surface. The resultant slurry is rinsed off with more water and extracted using a wet vacuum.

The downstairs WC was approached using much the same method except the space was tighter so we had to use smaller six-inch burnishing pads fitted to a handheld buffer.

After completing the burnishing process, I scrubbed the grout with a narrow brush and a strong dilution of Tile Doctor Pro Clean, which is a high performance alkaline cleaner, to remove any dirt and stains.

Last step before leaving was to rinse both floors with water to remove any trace of cleaning solution. The wet vacuum was then used to remove as much water and moisture from the tiles as possible.

Limestone Bathroom Floor Merchiston during

Sealing a Limestone Tiled Bathroom Floor

I left the floor to fully dry out overnight before returning the next morning to re-seal the stone which would protect it from future staining.

My choice of sealer was Tile Doctor Colour Grow, which is the ideal sealer for sealing Limestone. As an impregnating sealer, it penetrates deep into the pores of the stone to fill them and prevent dirt from becoming ingrained there. It also subtly enhances the natural shades in the stone.

Limestone downstairs toilet Floor Merchiston after
The customer was delighted with the job as both floors were completely transformed. It’s sometimes hard to believe how long some tiles go without proper maintenance, but it’s equally amazing just how quickly they can be rejuvenated with the right products and methods!

Limestone Bathroom Floor Merchiston after
 

Restoring the Polish on Limestone Floors in Edinburgh

Polished Limestone Bathroom Tiles Transformed in Merchiston, Edinburgh Read More »

Flagstone Tiles Rejuvenated at Home of International Footballer in Edinburgh

Flagstone Tiles Rejuvenated at Home of International Footballer in Edinburgh

Our tiled floor restoration services have attracted a number of high profile customers over the years. In fact, not too long ago I was contacted about restoring a Flagstone tiled floor at a property in Edinburgh belonging to a Scotland international footballer.

The tiles and grout were in real need of professional cleaning and sealing because it clearly had not experience adequate maintenance in a while. Here’s a quick overview of how I was able to get the floor back to looking its best.

Flagstone Kitchen Floor Edinburgh Before Cleaning Flagstone Kitchen Floor Edinburgh Before Cleaning

Cleaning a Dirty Flagstone Tiled Floor

First of all, we cleaned the tiles and grout using a mix of two products: Tile Doctor Pro Clean and Tile Doctor Remove and Go. Pro Clean is our high alkaline cleaner and is a very reliable product for removing soil from natural stone. Remove and Go serves the more specific purpose of stripping away any old sealer and breaking down any paint and adhesive stains.

After completing the initial clean, I used gave the tiles another wash using a solution of Pro Clean and water,
before extracting any dirty slurry with a wet-vac machine. I did this several times until I was happy the floor was clean to the best possible extent. I also filled in any missing cement in joints and then installed drying equipment to help dry out the Flagstone tiles overnight.

Sealing a Flagstone Tiled Floor

Upon returning to the property the following day I did a quick check for any damp issues. Thankfully none were present, so I was able to proceed with sealing the tiles using seven coats of Tile Doctor High Shine.

This sealer is a specially formulated water-based blend of acrylic polymers, providing both a stain resistant surface seal and a durable high-sheen finish. By doing so it eliminates the need for sealing using two products to achieve that effect.

Flagstone Kitchen Floor Edinburgh After Sealing Flagstone Kitchen Floor Edinburgh Completed

The restoration process was really transformative, as you can see from the photos above. The tiles compliment the design of the property very nicely and it’s great to know that they can now be kept looking fantastic for longer. Another satisfied customer!

Professional Tile Cleaning and Sealing for a Dirty Flagstone Tiled Floor Restoration in Edinburgh

Flagstone Tiles Rejuvenated at Home of International Footballer in Edinburgh Read More »

Restoring an Old Quarry Tiled Porch Floor in Edinburgh West End

Restoring an Old Quarry Tiled Porch Floor in Edinburgh West End

The restoration of this old Quarry tiled porch floor was carried out at a house in the west end of Edinburgh famous for its historic buildings and cobbled streets. The tiles were very old (possibly Victorian) and a number had patterns painted on with a stencil at some time in the past and these had now worn away leaving mainly white paint, I’m sure the patterns looked great initially but years of wear and tear had certainly taken their toll on them.

Quarry Tiled Porch Before Cleaning Edinburgh

Cleaning Quarry Tile and Grout

First the floor was covered with a Tile Doctor Oxy-Gel which is a new product based on the popular Pro-Clean product but in a more manageable gel form. We left the Oxy-Gel to soak into the pores of the tile for ten to fifteen minutes, we were working in a tight space so the gel ensured the product remained in position. The tiles were then scrubbed by hand and then rinsed which removed most of the hard ground in dirt.

To remove what was left of the paint stencils the tiles were individually treated with Tile Doctor Remove and go which is a powerful coatings remover, its was worked into the tile as before and the paint came away.

Last step before sealing was to give the floor a final clean with another solution of Oxy-Gel and then rinsed with neutral tile cleaner and water to remove any trace of cleaning product and then left to dry off overnight.

Sealing Quarry Tiles

We came back the next day and checked a few areas to make sure the floor was dry before sealing. The tiles were dry so the sealing process was started using Tile Doctor Seal and Go which is an ideal sealer for Quarry tiles as it affords good stain protection whilst adding a nice subtle sheen to the floor, five coats were required before the tiles had become fully sealed.

Quarry Tiled Porch After Cleaning Sealing
The porch tiles now look much fresher and with the new sealer should keep looking that way for some time in the future.

Quarry Tiled Porch After Sealing with Seal and Go
 

Deep Cleaning and Sealing a Quarry Tiled Vestibule in Edinburgh

Restoring an Old Quarry Tiled Porch Floor in Edinburgh West End Read More »

Damaged Marble Lamp Base Restored in Fife

Damaged Marble Lamp Base Restored in Fife

At this property in Fife, I was asked to restore not a tiled floor, but in fact a solid black Marble lamp base. The lamp base was particularly by scratched and damaged as a result of a lack of care and consideration by a removal company. It’s a shame to see such a high-quality item suffer this kind of damage; nonetheless, I was keen to help with restoring it back to looking its best.

Scratched Black Marble Lamp Base Before Restoration Fife
I arranged to collect the base the next time we were working in the area of Fife, a historic area of Scotland which houses St. Andrew’s, one of the world’s oldest universities. The customer and I agreed that I would drop it back a week later following the restoration.

Scratched Black Marble Lamp Base During Restoration Fife

Restoring a Damaged Black Marble Lamp Base

Restoring the appearance of the Marble (and other high-end stones such as Limestone) commonly requires a process known as burnishing.

To begin, we applied to the base the first of a set of four six-inch burnishing pads. This pad, which had a Coarse grit, was fitted to a small handheld buffing machine and used to burnish the Marble with a little water for lubrication. I then worked my way through the pad system to apply Medium, Fine and Very Fine grit burnishing pads. The process gradually improved the appearance of the base, managing to remove some of the lighter scratches; however, it became clear that more work was required to fully complete the restoration.

Scratched Black Marble Lamp Base After Restoration Fife
To take the restoration process a step further, I went on to use a set of four diamond encrusted hand burnishing blocks, which were applied to the Marble in a similar way to the previous stage. I followed up with another application of the six-inch burnishing pads: a process I’m happy to confirm successfully removed all scratches.

The base was then given a final polish and sealed using Tile Doctor Shine Powder (a sealer in the form of a crystallising powder) to seal the stone and provide the extra gloss look shine and durable finish requested by the client.

Scratched Black Marble Lamp Base After Restoration Fife
The customer was delighted with the results when I returned the Marble lamp base a week later. While it’s unfortunate that the base was damaged so badly to begin with, it’s certainly comforting to know that these valuable stone objects can be restored fully with the right methods.

Black Marble Stone Antique Restoration in Scotland

Damaged Marble Lamp Base Restored in Fife Read More »

Dirty Travertine Tiled Floor Cleaned and Polished in Ayrshire

Dirty Travertine Tiled Floor Cleaned and Polished in Ayrshire

When we arrived at this property in Ayrshire, Edinburgh, it appeared as though the owner’s Travertine tiled floor was in relatively decent condition.

On closer inspection, however, we could see that the grout lines were quite dirty and, while there was still a visible shine to the surface, it had become cloudy, likely due to a lack of sufficient maintenance.

Travertine Floor Before Polishing Ayrshire
This was a big concern for the owner, and so they contacted me to see what I could do to remedy the situation.

Cleaning and Burnishing a Dirty Travertine Floor

After agreeing with the customer to undertake the work, I travelled to the property in Ayrshire, a county located in the South West of Scotland, on the shores of the Firth of Clyde.

Upon arrival, I set about using a set of large diamond encrusted burnishing pads fitted to a rotary machine to strip the tiles of old surface sealer, break down the layers of dirt, and restore the polished shine. The Tile Doctor burnishing system comprises four main pads of varying grit: I began by applying the Coarse grit pad, before moving on to Medium, Fine and Extra Fine to gradually achieve the desired level of polish.

Travertine Floor During Polishing Ayrshire
After burnishing the main surface of the floor, I used smaller, 6-inch pads to pay particular attention to the edges and corners. Then, to complete the cleaning process, I scrubbed a strong solution of Tile Doctor Pro Clean into the grout limes to remove ingrained dirt and stains. I also noticed some holes in the grout as well as some completely missing, and also promptly replaced these with new grout.

Sealing a Travertine Floor

The floor was then left overnight in order to allow it to time to dry completely. In the morning I returned to the house and opted to give the floor a final polish with the extra fine burnishing pad before sealing.

My choice of sealer was Tile Doctor Colour Grow, which was applied in two separate coats to protect the floor against wear and tear, while also accentuating the natural shades in the stone thanks to the sealer’s colour intensifying formula.

Travertine Floor After Polishing Ayrshire
I’m pleased to say that my customer’s worries about this Travertine tiled floor have now been put to rest. The results were very pleasing for both myself and the customer, and I made sure to offer some general tile maintenance advice before being on my way. Another happy customer.

Travertine Floor After Polishing Ayrshire
Thomas Wilson
Edinburgh Tile Doctor

Professional Travertine Tiled Floor Maintenance in West Scotland

Dirty Travertine Tiled Floor Cleaned and Polished in Ayrshire Read More »

Original Marble Tiled Bathroom Floor Restored at a Hotel in Walkerburn

Original Marble Tiled Bathroom Floor Restored at a Hotel in Walkerburn

Windlestraw is a picturesque Edwardian manor hotel overlooking the Tweed Valley, near Walkerburn in the Scottish Borders area of Scotland. One of the bathrooms in the manor was in the process of being refurbished when two layers of floor tiles were removed, unveiling an original Marble tiled floor dating back to the 1920s.

Marble Tiled Bathroom Floor Before Restoration Walkerburn
After the top layers of tile had been removed the Marble was still covered in old adhesive and cement and although Marble is known for its quality and durability the hotel owner didn’t want the building contractor to proceed any further in case they damaged it. The owner was keen to restore the Marble floor as an original feature so we were called in to set the situation right.

Marble Tiled Bathroom Floor Before Restoration Walkerburn

Refurbishing a Marble Tiled Bathroom Floor

To restore the floor I used two processes known as milling and burnishing. Milling literally involves grinding down uneven or rough surfaces using very coarse, diamond encrusted pads. The pads are usually used to resolve lippage issues on natural stone but in this case we needed to use the very coarse abrasive pads to grind off the adhesive and cement. I used a set of three coarse milling pads rinsing with water between each pad and starting with a 50 grit pad, before moving on to 100 and 200 grit pads. This process was very effective and ground off the cement and adhesive, while also removing any lippage in the tiles to leave a completely flat surface.

Milling leaves the surface of the Marble tiles clean but in a rough condition and this is where the second process Burnishing comes in. Similar to milling, burnishing focuses on achieving a polished finish with the application of ever finer grades of polishing pads and is often used to bring back the polish on Limestone and Travertine as well as Marble. Moving on to the burnishing, I worked my way through the four diamond encrusted pad system lubricating with a little water and again rinsing between each pad to remove the slurry. The grits go from Coarse (400 grit), Medium (800 grit), Fine (1500 grit) and then eventually Very Fine (3000 grit) and come in a 17” pad for use on a rotary floor machine and were applied twice in sequence to achieve a fantastic polished shine.

Sealing a Marble Tiled Bathroom Floor

The floor was given a final rinse and then dried with a wet-vacuum before we proceeded to seal the floor using Tile Doctor Shine Powder which is a crystallizing powder that is applied directly to the floor and worked in using a buffing pad fitted to a rotary machine.

Shine Powder provides a very high shine (as you can see from the photos), along with a tough durable finish. On top of this, it is suitable for sealing all natural stone, including, of course, Marble, along with Limestone, Granite, Slate and Travertine.

Marble Tiled Bathroom Floor After Restoration Walkerburn
The customer was absolutely delighted with the results as were we although it’s now up to them to ensure the bathroom fitters take appropriate care when completing the room which I’m sure will look absolutely fantastic when complete and no doubt add to the allure of this magnificent hotel in the Scottish Borders.

Marble Tiled Bathroom Floor After Restoration Walkerburn
 

Professional Restoration of an Original Marble Tiled Bathroom Floor in the Scottish Borders

Original Marble Tiled Bathroom Floor Restored at a Hotel in Walkerburn Read More »

Slate Tiled Floor Stripped, Cleaned and Resealed in Edinburgh

Slate Tiled Floor Stripped, Cleaned and Resealed in Edinburgh

Natural stone products such as Slate need to be sealed for it to look its best, the sealer brings out the best in the natural features and also protects the stone from dirt becoming ingrained in its pores and once that happens it becomes difficult to clean effectively and starts to lose its appearance.

A good example of this is the Slate Tiled Floor shown below where that we were asked to maintain in Edinburgh, the sealer had worn off allowing the stone to dull and the grout to become stained.

Slate Tiled Floor Before Cleaning Edinburgh

Cleaning Slates Flooring and Grout

There was still evidence of the previous sealer on the floor so the first job was to strip that off completely using a 50:50 solution of two Tile Doctor products, Pro-Clean and Remove and Go. The two products combined together make a powerful cleaner/stripper combination which was left to dwell and soak into the tile and grout for 10-15minutes.

Next step was to scrub the solution into the floor using a scrubbing pad fitted to a rotary machine and a stiff narrow brush was run along the grout lines. The now dirty solution was then extracted from the floor using a wet vacuum and the process repeated until all the previous sealers and coatings had been removed from the floor. The floor was then given a clean using just Pro-Clean to make sure all dirt had been removed again using a wet vacuum to extract the solution.

The final part of this process was then to give the floor a rinse with a diluted solution of Tile Doctor Neutral Cleaner to remove any trace of strong cleaning products and the wet vacuum was used to get the floor as dry as possible ready for sealing the next day.

Slate Tiled Floor Stripped Ready for sealing Edinburgh

Sealing Slate Floor Tiles

The floor was left overnight to dry and the following day we returned to seal the floor checking first it was dry. Sealing was done by applying five coats of Tile Doctor Seal and Go which will protect the floor going forward, adds a nice low sheen and works very well on Slate, Quarry and Victorian tiles.

Slate Tiled Floor After Sealing Edinburgh
The Slate floor came out really well and the tiles and grout now look like they were recently installed.

Slate Tile and Grout Floor Maintenance in Edinburgh

Slate Tiled Floor Stripped, Cleaned and Resealed in Edinburgh Read More »

Dirty Victorian Tiled Hallway Restored in Edinburgh

Dirty Victorian Tiled Hallway Restored in Edinburgh

Victorian tiled floors were popularised during the 19th century and continue to be in fashion to this day. However they do need to be properly maintained and many homeowners need assistance with this as was the case with this customer in Edinburgh. Their Victorian tiled hallway floor was very dull due to several layers of ingrained dirt, and was also marked in numerous places by paint splashes from decorating. The customer was unable to deal with these issues themselves, despite trying several times with everyday cleaning products and called us in to restore the floor back to looking its best.

Victorian Entrance Hallway Before Cleaning Edinburgh

Cleaning a Dirty Victorian Tiled Hallway

To begin, I mixed a 50:50 solution of Tile Doctor Pro Clean and Tile Doctor Remove & Go which creates a powerful cleaner/stripper solution. Pro-Clean is a high alkaline cleaner, while Remove & Go is specifically designed to break down adhesives, paints and any old surface sealer.

The solution was sprayed onto the tiled floor and left it to dwell for 5-10 minutes. It was then thoroughly scrubbed into the floor, and any excess residue was promptly extracted using a wet-vac machine.

The area was too tight to allow for a heavy rotary machine fitted with a scrubbing pad, so I opted to complete the cleaning process by hand. To ensure a high quality clean in lieu of the absent rotary machine, I scrubbed the floor three times over, successfully removing all of the paint marks and ingrained dirt in the process.

After cleaning it was important to neutralise any excess chemicals left over on the tiles, and I did this by washing the entire floor with Tile Doctor Neutral Tile Cleaner. A wet vacuum was used to remove as much moisture from the floor as possible and then it was left to dry fully overnight.

Sealing a Victorian Tiled Hallway Floor

On the second day, I returned to the house to seal the newly cleaned Victorian tiles. The customer specifically requested a natural, non-sheen finish for the surface seal; now normally I recommend Seal and Go for Victorian tiles however it does leave a shiny finish and so I switched to Tile Doctor Colour Grow which is an impregnating sealer that met the client’s requirements and has the additional benefit of improving the natural shades and colours within the tile. Three coats were applied to fully protect the tiles allowing the floor to dry between each coat.

Victorian Entrance Hallway After Cleaning Edinburgh
My customer was very happy with the results achieved over the course of two days. Before leaving the property I made sure to impart some advice on cleaning products and methods, to help the customer take long-term care of this fantastic Victorian floor.

Professional Victorian Tile Maintenance Service in Edinburgh

Dirty Victorian Tiled Hallway Restored in Edinburgh Read More »

Removing paint from a Victorian tiled hallway floor in Polwarth

Removing paint from a Victorian tiled hallway floor in Polwarth

This job was at house in Polwarth, a small parish through which flows the Union Canal, running from Falkirk to Edinburgh. The client had requested a clean for a Victorian tiled hallway set in the narrow reception area of the house.

Victorian Tiled floor Polwarth before cleaning
The tiled floor had been painted over by the previous owners of the house using a thick, red paint. Painting a tile floor in such a way can affect its wash-ability, and the paint can peel off over time especially in a high-traffic area such as a reception area or hallway such as this. The red paint would have to be removed in order to restore the tile underneath and reveal its natural state, as well as provide a thorough and much-needed clean.

Victorian Tiled floor Polwarth before cleaning

Removing paint from a Victorian tiled floor

The first step in the paint removal process was to spray the floor with a strong solution of Tile Doctor Pro-Clean mixed with Remove & Go. Pro-Clean is a heavy duty cleaner and degreaser, suitable for use on tile, stone and grout. Pro-Clean combines well with Remove and Go, which is a multi-purpose stripper capable of removing most sealers, adhesives and, particularly important for this case, paint. The solution was left to dwell after application to allow it to soak into the tile and soften the paint and dirt.

After 10 to 15 minutes we scrubbed the floor in order to remove as much of the paint as possible. The owner of the house was surprised to see the true colours of the tile appearing, which had been hidden beneath the paint for a significant period of time. As the red paint coating was particularly thick, we had to scrub the floor multiple times. In some areas the paint proved tricky to remove so it was necessary to use a steamer to steam clean the stubborn areas.

Once all of the paint had been successfully removed, the unveiled tile floor was treated to another clean using Pro-Clean, before being given a wash down and neutralised using Concentrated Neutral Tile & Stone Cleaner. It’s important to ensure any trace of strong cleaning products are removed from floor before the next step of sealing as it can impact the sealer leading to un-even results.

Sealing Victorian floor tiles

The floor was left to dry off overnight and we came back the next day to seal the tiles using four coats of Tile Doctor Seal & Go which is an ideal sealer for Victorian tiles as it provides stain protection whilst also bringing out the colours resulting in a subtle sheen appearance.

Victorian Tiled floor Polwarth after cleaning
You can see from the photos that after a thorough cleaning and sealing the floor was back to looking its best. I do wonder why someone would want to paint over such a fantastic Victorian tiled floor!

Victorian Tiled floor Polwarth after cleaning
 

Restoration of Victorian floor at a residence in Polwarth

Removing paint from a Victorian tiled hallway floor in Polwarth Read More »

Scroll to Top