tile restoration

Victorian Tiled Hallway Restoration Portobello Edinburgh

Victorian Tiled Hallway Deep Cleaned and Sealed in Portobello Edinburgh

This Victorian Tiled Hallway floor at a property in Portobello which is on the coast, East of Edinburgh. It had not been deep cleaned for some time and was looking very neglected. The owner felt it was time to get it renovated so we were asked to do the work.

Victorian Tiled Hallway Before Cleaning Portobello Edinburgh

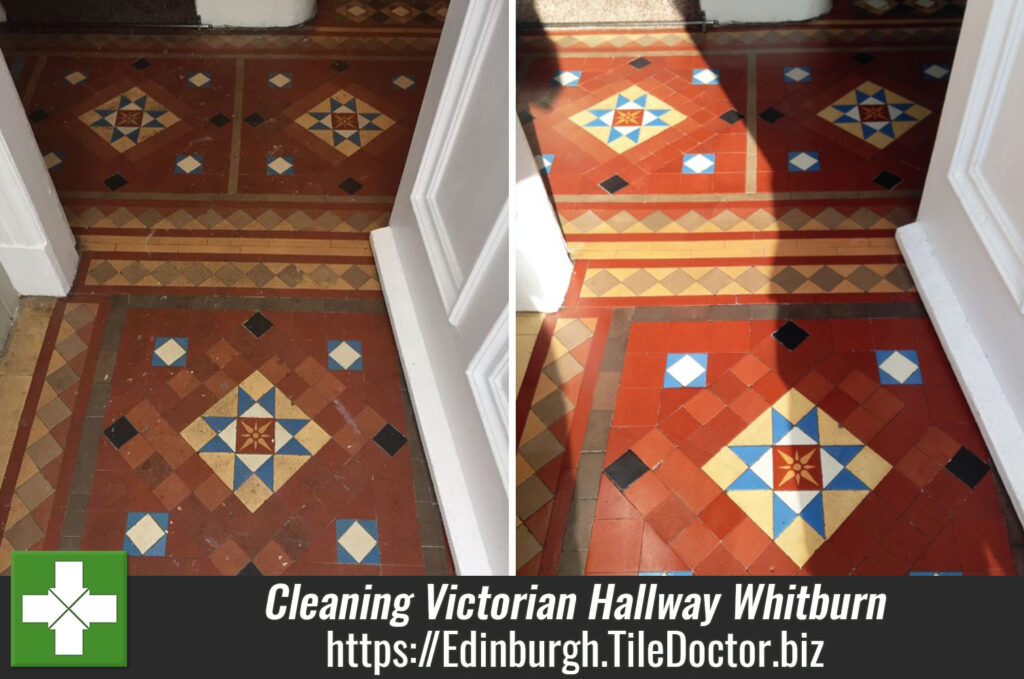
Any sealer protecting the tiles had long since worn off resulting in dirt becoming ingrained into the pores where it’s very difficult to shift. The dirt had built-up in the tiles, and they were also stained with a few paint splashes from decorating.

Victorian Tiled Hallway Before Cleaning Portobello Edinburgh Victorian Tiled Hallway Before Cleaning Portobello Edinburgh

Additionally, there were three small tile repairs that were needed and some grouting to do. Happy to assist I came up with a restorative cleaning plan for the floor that was considerate of its age and provided a quote for doing the work.

Renovating a Victorian Tiled Hallway Floor in Portobello Edinburgh

Old floors like this one don’t have a damp proof membrane under the floor so you have to be wary of how much water you use during cleaning, if you use too much it could take a long time to dry out and you can seal it.

To start the cleaning I have the whole floor an Acid Wash using Tile Doctor Grout Clean-up. The product is applied to the floor and left to soak in for ten minutes before being worked in with low grit brushes fitted to a rotary buffer. Then after going over the floor a few times the floor was wiped with damp cloths and speed dried with air movers. The paint splashes had now been softened by the cleaning were be scraped off.

Victorian Tiled Hallway During Cleaning Portobello Edinburgh

Giving a floor like this an acid wash also has the advantage of neutralising any efflorescent salts in the tiles which can be an issue with old floors like this one.

With that complete I started with repairs which involved carefully removing the three broken tiles, cleaning up the base and then laying replacements which I had managed to source earlier. Your really have to be careful when removing tiles on a floor of this age as it doesn’t take much to upset the neighbouring tiles and before you know it your re-tiling a area much larger than you had originally planned for.

Once the replacement tiles had set and grouted in, I was able to move onto the next step of scrubbing the floor with a 200, 400 and then 800-grit Diamond burnishing pad. A little water is used to help lubricate the process which opens and then closes the pores on the surface allowing the dirt to be flushed out and makes the tiles slightly smoother. We find doing this also speeds up drying times. The water turns into a slurry which is removed with a wet vacuum after each pad is applied.

Victorian Tiled Hallway During Cleaning Portobello Edinburgh

Sealing a Victorian Tiled Hallway Floor

With the floor clean it was left to dry off for a week before returning to seal the tiles, applying a sealer to a damp floor can result in a cloudy appearance so it’s always best to wait.

The sealer chosen for this floor was Tile Doctor X-Tra Seal, it’s an oil-based long lasting breathable impregnator that’s rated for external as well as internal use; these are perfect credentials for a Hallway floor at the front of the house which is likely to get wet often.

The sealer brought the floor to life enhancing the deep colours giving the floor hardwearing protection that should last many years to come. The fresh sealer will ensure dirt remains on the surface where it can be cleaned away easily.

Victorian Tiled Hallway After Cleaning Portobello Edinburgh

Before leaving I took time to explain the importance of using a neutral pH tile cleaning product such as Tile Doctor Neutral Cleaner for day-to-day cleaning. A lot of products you find in supermarkets contain bleach and are simply too strong for cleaning a sealed surface and will quickly erode the sealer with use.

Victorian Tiled Hallway After Cleaning Portobello Edinburgh Victorian Tiled Hallway After Cleaning Portobello Edinburgh


Professional Restoration of a Victorian Tiled Hallway in Portobello Edinburgh

Victorian Tiled Hallway Deep Cleaned and Sealed in Portobello Edinburgh Read More »

Victorian Tiled Floor Before After Restoration Edinburgh

Glue-Stained Victorian Tiled Hallway Repaired and Restored in Edinburgh

As you can see from the photographs below this beautiful Victorian Tiled Hallway floor in Edinburgh was in a bad state of repair. The floor has been covered with carpet for many years and the thick adhesive had completely stained the tiles; in fact, you can still see the pattern of the underlay marking the worst parts of the tile. It could be worse as I have seen this done with gripper rods nailed straight through the tile before.

Victorian Tiled Hallway Floor Edinburgh Before Restoration Victorian Tiled Hallway Floor Edinburgh Before Restoration

On top of that part of the floor had completely collapsed between the staircase and doorway to the bathroom. This would need to be raked out, backfilled with cement and then re-tilled with replacement tiles that were a close match to the original

Victorian Tiled Hallway Floor Edinburgh Before Restoration

I discussed with the client the work needed to carry out a full restoration and gave them a quote. Aware of the fact that original tiled hallways can improve the value of a property they were happy to accept and we scheduled a date for the work to commence.

Removing Carpet Adhesive from a Victorian Tiled Hallway Floor

Work started by carefully removing as much of the thick glue and underlay as possible with hand scrapers. Once done I treated the floor with Tile Doctor Acid Gel and scrubbed it in with a rotary floor buffer machine fitted with a Black pad. This generated a lot of soiling that was then extracted with a wet vacuum and the floor inspected.

It was obvious to see that more work was needed to remove all traces of the glue so I decided to switch up a gear and use more Acid Gel but this time scrubbed in with a very coarse 100-grit diamond pad followed by a 200-grit pad. Encrusted with industrial diamonds these pads are more expensive than the black scrubbing pads however using the black pad first did remove a lot of the large particles that would have otherwise clogged up the diamond pads. This process worked well and by the end of the afternoon I had managed to remove all the debris left by the carpet and glue.

Victorian Tiled Hallway Floor Edinburgh During Restoration

Repairing a Collapsed Victorian Tiled Hallway Floor

The next ask was to focus on the collapsed section of flooring which started by cleaning out the rubble and backfilling with concrete board and cement until it was level with the existing floor.

Victorian Tiled Hallway Floor Edinburgh During Restoration

I used around forty reproduction Victorina Tiles in this area carefully placing them to match the original pattern and cutting them to the right size where required. A fast-setting adhesive was used to fix them in place followed by grouting.

Victorian Tiled Hallway Floor Edinburgh During Restoration

Sealing a Victorian Tiled Hallway Floor

You can’t apply a sealer to a damp floor and the tiles needed some time to dry out after the cleaning so it was around a week later before I returned to finish the work by applying a protective sealer.

Given the age of the floor I decided to apply a fully breathable sealer called Tile Doctor Colour Grow. This is an important consideration when sealing old, tiled floors as it will allow for any moisture to rise through the tile and evaporate at the surface, otherwise moisture can become trapped until the floor resulting in damp issues. Colour Grow also contains a colour enhancer that brings out the colours in the tile and works by soaking into the pores of the tile making it long lasting, again another important consideration for a busy hallway.

Victorian Tiled Hallway Floor Edinburgh After Restoration Victorian Tiled Hallway Floor Edinburgh After Restoration

The client was very pleased with the newly restored floor, and for ongoing cleaning I recommended the use of Tile Doctor Neutral Tile Cleaner. This product has a neutral Ph which is ideal for sealed surfaces; stronger bleach-based cleaners are simply too strong for use on sealed tiles and will erode the sealer prematurely.

Victorian Tiled Hallway Floor Edinburgh After Restoration


Professional Restoration of a Victorian Tiled Hallway in South Yorkshire

Glue-Stained Victorian Tiled Hallway Repaired and Restored in Edinburgh Read More »

Shower Grout Before and After Restoration in Edinburgh

Porcelain Shower Cubicle Tiles Expertly Refreshed in Edinburgh

Porcelain is a popular choice for tiles in modern homes due to its superior durability. It also makes a particularly suitable material for shower tiles because of its natural water resistance. Nonetheless, Porcelain tiles – just like any other type of tile – still require routine cleaning and maintenance to stay looking fresh and attractive.

This is especially the case for shower tiles, as they are subject to mould and scum caused by exposure to the dyes in shampoos and soaps etc which as well as staining the tiles can have a dramatic effect on the grout. Below is a photo of a Porcelain shower cubicle I was asked to restore in Edinburgh. The process for restoring these types of tiles is relatively quick and easy, providing you use the right products and methods. Here’s how I did it.

Shower Grout Before Restoration in Edinburgh

Cleaning and Sealing Porcelain Shower Cubicle Tiles

To begin refreshing this cubicle, I gave the whole area – paying particular attention to the grout lines – a scrub down using Tile Doctor Duo Clean. Duo Clean is our product of choice for the removal of the common mould and soap scum that builds up on cubicles like this one.

Next, I rinsed down the area with fresh water to remove any trace of cleaning product and then left it to dry for a short period of time. It’s difficult to get the grout lines perfectly clean, especially after years of neglect, but we can resolve the situation by simply recolouring the grout.

Shower Grout During Restoration in Edinburgh
I this case I felt the grout although cleaner from when I started did need more work so I decided to go ahead and apply a Grout Colourant. Tile Doctor has a range of Grout Colourants available in ten colours so I painted on three coats of the white colourant which really improved the look of the grout leaving it clean and fresh. Another advantage is the colourant acts as a barrier on top of the grout sealing the grout joint and protecting them from further staining. Other popular colours available in the range include Black, Cappuccino, and three shades of Grey.

Finally, I ripped and out and replaced the mouldy silicone around the base of the shower cubicle and replaced it with fresh.

Shower Grout After Restoration in Edinburgh
The client was very impressed with the speedy restoration. Before leaving the property, I explained that rinsing down the shower cubicle with fresh water after every use can help to reduce the effect of staining and leaving the door and window open after a shower improved ventilation and inhibit the growth of mould. Naturally you can always give me call if the situation gets out of hand.

Professional Tile Cleaning, Grout Recolouring and Sealing for a Mouldy Porcelain Shower Cubicle Restoration in Edinburgh

Porcelain Shower Cubicle Tiles Expertly Refreshed in Edinburgh Read More »

Victorian Tiles Before and After Cleaning in Whitburn

Cleaning Victorian Hallway Tiles in Whitburn

This dull and un-inviting Victorian tiled entrance hall was located at a house in the small town of Whitburn in West Lothian which is half between Glasgow and Edinburgh. The tiles were in need of a deep clean and seal and we do see our fair share of Victorian tiled floors in this area and so have become quite experienced in their maintenance.

Victorian Tiles Before Cleaning in Whitburn

Cleaning Victorian Tile and Grout

To clean the floor and remove any remaining sealer a strong dilution of Tile Doctor Pro-Clean was applied to the floor and left to soak into the tiles for around fifteen minutes before being worked into the tile and grout using a black scrubbing pad fitted to a rotary bonnet machine. Pro-Clean is a heavy duty alkaline cleaning product that un-like acid based cleaners are safe to use on Tile, Stone and Grout.

The soiled cleaning solution was then rinsed off using water and then the whole process repeated; three times to ensure any remaining sealer was removed and the floor was clean. The final step was to neutralise the floor before sealing which we did by giving it a final wash with Tile Doctor Neutral Tile Cleaner, this time we extracted as much water as possible using a wet vacuum and then left the tile to dry off overnight.

Sealing Victorian Tiles

We came back the next day and after checking the floor was clean and dry proceeded to seal the tiles using five coats of Tile Doctor Seal and Go. Seal and Go is a water based sealer so it doesn’t leave a smell as its drying, it also offers good stain protection and adds a nice sheen to the floor.

Victorian Tiles After Cleaning in Whitburn
The entrance tiles now look new again and the sealer should keep it that way for a long time to come.

Victorian Tile Deep Cleaned and Sealed near Edinburgh

Cleaning Victorian Hallway Tiles in Whitburn Read More »

Terracotta Floor Tiles Edinburgh Before and After Cleaning

Terracotta Tiled Floor Cleaned in Edinburgh

This Terracotta Tiled Floor in the lounge of a house in Edinburgh was ingrained with dirt from what must have been years of use since it was last given a thorough deep clean and seal.

Terracotta Floor Tiles Edinburgh Before Cleaning

Cleaning Terracotta Tile and Grout

This floor was very dirty so to get them clean a strong dilution of Tile Doctor Pro-Clean was applied and left to soak into the pores in the Terracotta for a good while. More Pro-Clean was applied and then worked into the tiles using a rotary bonnet machine fitted with a black scrubbing pad. This action saw the dirt coming out of the floor and it was rinsed away with water using a wet vacuum to extract the soil.

The process was repeated three times before the Terracotta tiles were clean; we also used a stiff grout brush along the grout lines during this process and then at the end the floor was given a good rinse down with more water again a wet vacuum was used to extract the water and get the floor as dry as possible.

Terracotta Floor Tiles Edinburgh After Cleaning

Sealing Terracotta Tiles

The photograph above shows the floor after cleaning as on this occasion and despite being advised against it the client didn’t want the floor sealed so we gave the floor a final wipe with Tile Doctor Neutral Cleaner with cloths to leave a clean finish. Terracotta is a very porous material and so it’s highly recommended that you seal it, leaving it un-sealed will soon see dirt becoming ingrained into the pores of the tile and once there it’s very difficult to remove without going through the deep cleaning process above.

When sealing Terracotta I would recommend Tile Doctor Seal and Go which gives the floor a nice sheen, if you prefer a more natural look however then choose Colour Grow which has the additional benefit of bringing out the natural colours in the tile.

Terracotta Tiled Floor Deep Cleaned in Edinburgh

Terracotta Tiled Floor Cleaned in Edinburgh Read More »

Scroll to Top