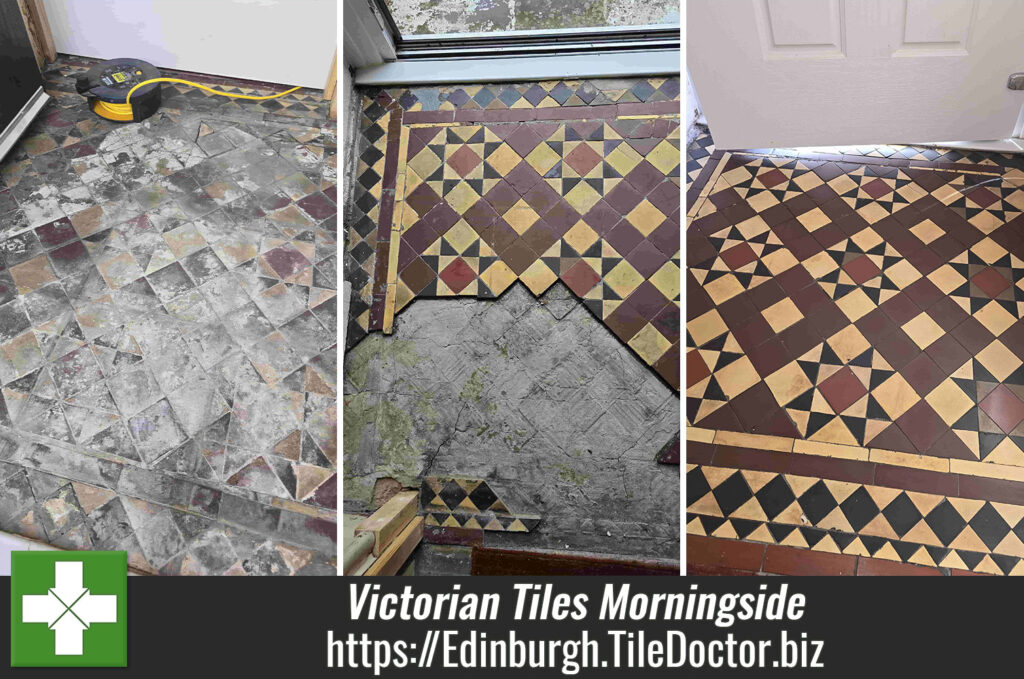
floor restoration

Victorian Tiled Hallway Floor Renovation Edinburgh

Victorian Hallway Renovated using Low Moisture Cleaning in Edinburgh

Details below of a another Victorian Hallway floor restoration that we completed recently in Edinburgh. The owner of the property was unhappy with how dull the floor had become and was keen for it to be renovated back to health.

Old Victorian tiles are porous and so do need to be sealed to protect them from ingrained dirt and staining, unfortunately sealers don’t last for ever and do wear down with use so if you want to keep your floor looking clean you do need to maintain the sealer.

Victorian Tiled Hallway Before Renovation Edinburgh

I’ll add more detail below but in total this project took three days to complete as there were a lot of tiles that had to be lifted and fixed back down again, this was all done on the first day and once set the whole porch area had to be regrouted.

Renovating a Victorian Tiled Hallway Floor in Edinburgh

As mentioned above the first day was spent ensuring the tiles were secure. This involved checking every tile by hand in the hallway and porch floor and identifying all the problems so they could be removed cleaned up and then re-laid with fresh adhesive.

It’s a lot of manual work but by the end of the first day the tiled floor was solid and ready for cleaning although I decided to come back to do the cleaning a few days later to give the repairs time to set.

Old floors like this one don’t have a damp proof membrane under the floor so you have to be wary of how much water you use during cleaning, if you use too much it could take days or even weeks before the floor dries out you can seal it. Fortunately, we have a solution and for situations like this we adopt a method called “Low Moisture Cleaning”

Victorian Tiled Hallway During Renovation Edinburgh

This method primarily involves giving the floor an acid rinse using Tile Doctor Acid Gel which being a gel is very easy to control. The gel is applied to the floor and left to dwell for a while before it is worked in with a coarse 200-grit burnishing pad. Then after going over the floor a few times with the pad the slurry extracted with a wet vacuum. The process was repeated two to three times until I was satisfied that tiles were as clean as possible. I then wiped the floor using a damp cloth dipped in a bucket with a mixture of Grout Clean-Up and water.

This method allowed us to get the tiles as clean as possible without the need of any alkaline cleaning products which can cause efflorescence issues later when the floor dries. Efflorescence is a common problem on floors of this age where a damp-proof membrane has not been fitted; moisture rises through the sub floor and tile carrying salts which then get deposited on the surface of the tile as the moisture evaporates. Once complete the floor was left to dry off overnight with an industrial fan in place to help with the drying and to ensure it would be ready for sealing the next day.

Sealing a Victorian Tiled Hallway Floor

On the final third day we returned to seal the floor testing the moisture level first with a damp meter to ensure the floor was dry. The results were positive, and I was happy that it was within the correct tolerance for the sealer to be effective. To seal the floor, we used Tile Doctor Colour Grow, applying three coats and letting each coat dry before applying the next.

Victorian Tiled Hallway After Renovation Edinburgh

The sealer enhanced the deep colours in the tile and gave the floor hardwearing protection that should last many years to come, the fresh sealer will also make them easy to clean. I should mention that Colour Grow is also fully breathable which is perfect for a floor with no damp-proof membrane, in that it won’t trap moisture under the tiles where is could eventually spread to the walls and lead to rising damp.

Before leaving I took time to explain the importance of using a neutral pH tile cleaning product such as Tile Doctor Neutral Cleaner for day-to-day cleaning. A lot of products you find in supermarkets contain bleach and are simply too strong for cleaning a sealed surface and will quickly erode the sealer with use.

Victorian Tiled Hallway After Renovation Edinburgh


Professional Restoration of a Victorian Tiled Hallway in Edinburgh

Victorian Hallway Renovated using Low Moisture Cleaning in Edinburgh Read More »

Victorian Tiled Floor Before After Restoration Edinburgh

Glue-Stained Victorian Tiled Hallway Repaired and Restored in Edinburgh

As you can see from the photographs below this beautiful Victorian Tiled Hallway floor in Edinburgh was in a bad state of repair. The floor has been covered with carpet for many years and the thick adhesive had completely stained the tiles; in fact, you can still see the pattern of the underlay marking the worst parts of the tile. It could be worse as I have seen this done with gripper rods nailed straight through the tile before.

Victorian Tiled Hallway Floor Edinburgh Before Restoration Victorian Tiled Hallway Floor Edinburgh Before Restoration

On top of that part of the floor had completely collapsed between the staircase and doorway to the bathroom. This would need to be raked out, backfilled with cement and then re-tilled with replacement tiles that were a close match to the original

Victorian Tiled Hallway Floor Edinburgh Before Restoration

I discussed with the client the work needed to carry out a full restoration and gave them a quote. Aware of the fact that original tiled hallways can improve the value of a property they were happy to accept and we scheduled a date for the work to commence.

Removing Carpet Adhesive from a Victorian Tiled Hallway Floor

Work started by carefully removing as much of the thick glue and underlay as possible with hand scrapers. Once done I treated the floor with Tile Doctor Acid Gel and scrubbed it in with a rotary floor buffer machine fitted with a Black pad. This generated a lot of soiling that was then extracted with a wet vacuum and the floor inspected.

It was obvious to see that more work was needed to remove all traces of the glue so I decided to switch up a gear and use more Acid Gel but this time scrubbed in with a very coarse 100-grit diamond pad followed by a 200-grit pad. Encrusted with industrial diamonds these pads are more expensive than the black scrubbing pads however using the black pad first did remove a lot of the large particles that would have otherwise clogged up the diamond pads. This process worked well and by the end of the afternoon I had managed to remove all the debris left by the carpet and glue.

Victorian Tiled Hallway Floor Edinburgh During Restoration

Repairing a Collapsed Victorian Tiled Hallway Floor

The next ask was to focus on the collapsed section of flooring which started by cleaning out the rubble and backfilling with concrete board and cement until it was level with the existing floor.

Victorian Tiled Hallway Floor Edinburgh During Restoration

I used around forty reproduction Victorina Tiles in this area carefully placing them to match the original pattern and cutting them to the right size where required. A fast-setting adhesive was used to fix them in place followed by grouting.

Victorian Tiled Hallway Floor Edinburgh During Restoration

Sealing a Victorian Tiled Hallway Floor

You can’t apply a sealer to a damp floor and the tiles needed some time to dry out after the cleaning so it was around a week later before I returned to finish the work by applying a protective sealer.

Given the age of the floor I decided to apply a fully breathable sealer called Tile Doctor Colour Grow. This is an important consideration when sealing old, tiled floors as it will allow for any moisture to rise through the tile and evaporate at the surface, otherwise moisture can become trapped until the floor resulting in damp issues. Colour Grow also contains a colour enhancer that brings out the colours in the tile and works by soaking into the pores of the tile making it long lasting, again another important consideration for a busy hallway.

Victorian Tiled Hallway Floor Edinburgh After Restoration Victorian Tiled Hallway Floor Edinburgh After Restoration

The client was very pleased with the newly restored floor, and for ongoing cleaning I recommended the use of Tile Doctor Neutral Tile Cleaner. This product has a neutral Ph which is ideal for sealed surfaces; stronger bleach-based cleaners are simply too strong for use on sealed tiles and will erode the sealer prematurely.

Victorian Tiled Hallway Floor Edinburgh After Restoration


Professional Restoration of a Victorian Tiled Hallway in South Yorkshire

Glue-Stained Victorian Tiled Hallway Repaired and Restored in Edinburgh Read More »

Damaged Victorian Tiled Hallway Floor Before After Restoration Edinburgh

Damaged Victorian Tiled Period Hallway Restored in Edinburgh

These are a few photos from a Victorian tiled hallway we restored in Edinburgh. The property is close to the beautiful city centre and is in a road with other Victorian properties. The floor was once stunning but was now overdue some love and care to restore it back to its’ former self.

Victorian Tiled Entrance Edinburgh Before Restoration

We went over to the property first to survey the floor and see for ourselves the extent of the work required before quoting for the restoration. The floor was incredibly dirty and there were a number of broken tiles that would need to be replaced or repaired. There are handful of companies where you can source matching tiles but with a floor of this age its not always possible. We discussed with the client the process we would follow to restore the floor which would take three days and agreed a price and date for the work. We also took away with us some of the broken tiles to assist in tracking down matching replacements.

Victorian Tiled Entrance Edinburgh Before Restoration

Restoring a Victorian Tiled Hallway Floor

We arrived on the first day and started by taping up the adjacent woodwork to protect it. The next step was to ensure the floor was completely sound before starting the cleaning process which meant dealing with the loose and broken tiles. The loose and broken tiles were removed and then replaced with new reproduction Victorian tiles that we had managed to source from Original Style. The tiles were cut to fit and then set into the floor with tile adhesive. Unfortunately, we were unable to source a replacement for a broken center pattern tile which had an intricate pattern, so we had to secure this back in place using the two broken pieces. With the tiling work completed there was nothing else we could do so we left to allow the adhesive to set.

Victorian Tiled Entrance Edinburgh Before Restoration

Returning the following day, we began the cleaning process using a set of coarse burnishing pads fitted to a rotary machine. 100, 200 and then a 400-grit burnishing pad was applied in sequence. Then after going over the floor a few times with the pads the floor was rinsed with water which was then extracted with a vet vacuum to remove the fine slurry that was generated. This process ground off the dirt and refined the surface of the tile ensuring the old and new tiles made a perfect match.

The next step was to give the floor an acid wash using Tile Doctor Acid Gel which is scrubbed into the tiles and then rinsed off and extracted as before. This allowed us to get the tiles as clean as possible without the need of any alkaline cleaning products which can cause efflorescence issues later when the floor dries. Efflorescence is a common problem on floors of this age where a damp-proof membrane has not been fitted; moisture rises through the sub floor and tile carrying salts which then get deposited on the surface of the tile as the moisture evaporates. Once complete the floor was left to dry off overnight in readiness for sealing process the next day.

Sealing a Victorian Tiled Hallway Floor

On the final third day we returned to seal the floor testing the moisture level first with a damp meter to ensure the floor was dry. The results were positive, and I was happy that it was within the correct tolerance for the sealer to be effective. To seal the floor, we used Tile Doctor Seal and Go Extra, applying 5 coats and letting each coat dry before applying the next.

Victorian Tiled Entrance Edinburgh After Restoration

The sealer gave enhanced the look of the floor leaving a hardwearing sheen surface which will protect the tiles will also make them easy to clean going forward. This sealer is also fully breathable which is perfect for a floor with no damp-proof membrane in that it won’t trap moisture under the tiles where is could eventually spread to the walls and lead to rising damp.

The client was very happy with the restored floor, the colours were now very vibrant, and the dull entrance hall had been transformed to an inviting space.

Victorian Tiled Entrance Edinburgh After Restoration


Professional Restoration of a Victorian Tiled Hallway in Edinburgh

Damaged Victorian Tiled Period Hallway Restored in Edinburgh Read More »

Victorian Tiles Before and After Cleaning in Musselburgh

Cleaning Dirty Victorian Tiles Floor in Musselburgh

We had a great result on this Victorian tiled floor at a house in Musselburgh which is five miles east of Edinburgh and apparently one of the oldest towns in Scotland. If you take a close look at the photograph below you can see how dirty the tiles were before we got started.

Victorian Tiles Before Cleaning in Musselburgh

Cleaning Victorian Tile and Grout

We were quite lucky with the floor in that it was in good physical shape and really just need a deep clean and re-seal. So the first step was to strip of any old remaining sealer or other coatings from the tiles using a strong solution of Tile Doctor Pro-Clean which is safe to use on these old tiles. The solution was mopped onto the tile and grout and then scrubbed in using a rotary bonnet machines fitted with a black scrubbing pad. The soiled cleaning solution was then rinsed off using water and then the whole process repeated; three times in fact before being satisfied that the floor was clean. The floor was given a final rinse using Neutral Tile cleaner and then water extracted using a wet vacuum before being left to dry overnight.

Sealing Victorian Tiles

We came back the next day and checked a few areas to make sure the floor was dry before sealing. The tiles were dry so the sealing process was started using Tile Doctor Seal and Go which is an ideal sealer for Victorian Tiles as it affords good stain protection whilst adding a nice subtle sheen to the floor, five coats were required before the tiles had become fully sealed.

Victorian Tiles After Cleaning in Musselburgh
I think you will agree the tiles look transformed and the sealer should keep them looking that way for some time to come.

Victorian Tile Deep Cleaned and Sealed near Edinburgh

Cleaning Dirty Victorian Tiles Floor in Musselburgh Read More »

Polished Marble Before and After

Marble Tiled Kitchen and Hallway Cleaned and Polished in Edinburgh

Details below of a Marble Tiled floor installed in the hallway and kitchen of a house in Edinburgh. The tiles were in good physical shape but had lost their polished appearance over time resulting in a dull un-appealing finish. This is not unusual for polished stone especially in high traffic areas such as hallways and kitchens.

Polished Marble Kitchen Edinburgh Before

Cleaning Marble Floor Tile and Grout

Our first job was to give the floor a general clean to remove grime and dirt especially along the grout lines. This was done by applying a strong dilution of Tile Doctor Pro-Clean which is left to dwell on the floor before being scrubbed in, Pro-Clean is an alkaline cleaner so it’s safe to use on tile and stone unlike acidic cleaners which can damage the surface of the stone over time. The now dirty cleaning solution was removed using a wet vacuum and the floor given a rinse using water.

Marble Tiled Floor Polishing

The next step was to burnish the Marble which is a process that removes ingrained dirt and brings up the polish on the tile. The process involves the application of four diamond pads in sequence; you start with the coarse pad together with a little water and this cuts through and removes surface grime and any surface seal. You then progress through the other finer pads one by one until you get to the final polishing pad which provides a high polish.

Polished Marble Kitchen Edinburgh After
When the Burnishing process was completed Tile doctor Shine powder which is a crystallising powder is worked into the floor using a bonnet machine fitted with a buffing pad and a little water; it adds an extra level of deep shine to the marble floor giving it that extra wow factor together with a tough durable finish.

Polished Marble Hallway Edinburgh After
 

Cleaning and Polishing a Marble Tiled floor in Edinburgh

Marble Tiled Kitchen and Hallway Cleaned and Polished in Edinburgh Read More »

Quarry tiles Before and After cleaning and colouring

Stained Quarry Tile Grout Cleaned and Coloured in Livingston

The grout on this Quarry tiled floor in the kitchen of a house in Livingston near Edinburgh was proving impossible to clean effectively and had now become badly stained with dirt and grime and had gone dark in the process making it obviously dirty when compared with the clean areas.

Quarry Tiles Before Cleaning and Colouring

Cleaning Tile and Grout

The first step when cleaning grout is to apply a strong solution of Tile Doctor Pro-Clean which is a strong alkaline cleaning agent. The solution is mopped onto the tile and grout and then scrubbed in by hand with a stiff brush along the grout lines, Pro-Clean is also a good general tile cleaner so it worked well on the Quarry Tiles as well. The soiled cleaning solution was rinsed away with water and as much water as possible was removed using a wet vacuum. Next we left the floor to allow it to dry leaving a turbo air mover in help to speed up the process.

Quarry Tiles Before Cleaning and Colouring

Sealing Quarry Tiles

When the floor was dry it was clear that the grout would never be clean enough to match with the areas that were still white so we agreed to apply a white epoxy Grout Colourant to resolve the problem. The group colourant is applied by hand and is painted onto the grout using a small brush; any excess is then wiped off the tile. Two coats were required on this floor.

Quarry Tiles After Cleaning and Colouring
The floor now looks like it has come back to life and as you can see all the grout now has a uniform colour and should stay that way for a long time as the added advantage of an epoxy grout colourant is it forms a barrier over the grout that will seal and protected it.

Quarry Tiles After Cleaning and Colouring
 

Quarry Tile and Grout Cleaning and Colouring in Livingston, West Lothian

Stained Quarry Tile Grout Cleaned and Coloured in Livingston Read More »

Scroll to Top