Dirty and Pitted Travertine Floor Restored in Inverkeithing Firth of Forth
A new homeowner from the Royal Burgh of Inverkeithing, Fife not far from the Forth crossings made contact regarding their Travertine tiled floor. The installation was quite large and covered the entire ground floor of the 200-year-old property including the Kitchen. Having worked on similar Travertine floors I was confident we could resolve the issue of heavy soiling and pitted tiles.

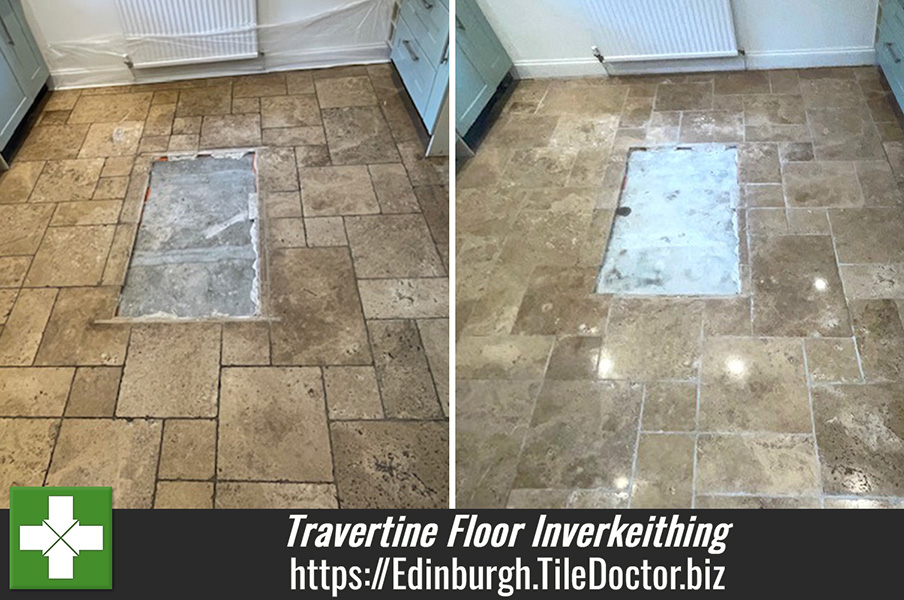
I arranged to call in and survey the tiled floors in each room so I could get a better understanding of the issues and provide a quote for the renovation. I could see the main problem was heavy soiling but there was also pitting in the tiles which is quite common with Travertine but in this case was impacting the look of the floor. Pitting is basically small holes in the surface of the tile and is usually unnoticeable, however in this case dirt had become ingrained in the tile surfaces and the floor was proving very difficult to clean leaving it looking dull and permanently dirty.
I proposed deep cleaning the Travertine to remove the ingrained dirt and then filling the holes with a colour matching resin to prevent this happing in future. Then polishing the Travertine to restore their appearance and finally adding a protective sealer to keep them looking that way going forward.
Having taken measurements and copious notes, I was able to send over a detailed quote which was accepted and then a date agreed for the work to begin.
Cleaning, Filling and Polishing a Travertine Tiled Kitchen Floor
The floor was swept to remove any loose dirt and grit before starting the cleaning process with the first of a set of four burnishing pads which is a coarse 400-grit fitted to a rotary machine. This pad is designed to remove minor scratches, sealers whilst opening the pores of the stone so ingrained soiling can be flushed out. The pad is applied to the floor with water for lubrication and each tile is worked over four times to ensure maximum contact. The dirt is literally pulled out of the Travertine into the water turning it black and then once a section has been cleaned the floor is rinsed with water and the soiling extracted with a wet vacuum.
After the first pad attention was turned to the grout lines which is cleaned by hand using a stiff grout brush and Tile Doctor Pro-Clean. This combination reaches into the recessed grout lines where pads can struggle to reach and pulling out the soiling and returning the darkened grout back to its original appearance. Afterwards the floor is rinsed and extracted again with water.
The burnishing process was then repeated using the second and third pads using the same process. This starts with a medium 800-grit pad and then a finer 1500-grit pads rinsing with water after each and extracting the slurry with the wet vacuum as before. These finer pads close the pores in the stone and start to bring up the polish on the stone.
I use air blowers to speed up the drying time during this process and once completed work moved onto filling the pitted areas with a resin filler. The filler is colour matched to blend in with the natural brown and cream colours of the Travertine as closely as possible. The resin takes approximately 30 minutes to properly set.
Sealing a Travertine Tiled Kitchen in Inverkeithing
Sealing needs to be applied when the tiles are dry so I returned a few days later day and started off by going over the floor with the last pad in the set which is a very fine 3500-grit. This last pad is applied dry with a small spray of water on the floor. The 3500-grit pad polishes and dries the floor whilst smoothing off any filler in the pitted areas of the tiles.
The last step was to be sealing the floor to prevent dirt from becoming ingrained going forward and make it easier to clean. As the tiles were light in colour, we choose a natural look sealer called Tile Doctor Ultra-Seal for this. It’s a tough sealer that suits heavy traffic areas and I find is best applied using a paint pad applicator. Ultra-Seal is an impregnator which works by soaking into the pores of the stone ensuring dirt remains on the surface where it can be easily cleaned away.

Although my photographs are not the best hopefully you can see how much cleaner and shinier the Travertine tiles are and how white the grout has become, certainly my customer was pleased with the transformation. For aftercare I recommended the use of Tile Doctor Stone Soap which is a mild yet effective cleaning product that has an additive that helps maintain the lustre on polished stone.
Professional Renovation of a Travertine Tiled Kitchen Floor in Edinburgh
Dirty and Pitted Travertine Floor Restored in Inverkeithing Firth of Forth Read More »